Theming with CSS Custom Properties
There’s been a lot of buzz around CSS Custom Properties (more commonly known as “CSS variables”) in the front-end world these days. If you were like me, you might have initially turned a deaf ear to all the hoopla. We already have preprocessor variables, so what makes CSS variables so amazing?
 CSS, get with it. variables were so ten years ago.
Yes, preprocessor variables are great for storing constant values that can be reused throughout your stylesheet for consistency. For example, typically, one would utilize a preprocessor variable like so:
$brandingColor: #F37621;

.content {
  background-color: $brandingColor;
}
.sidebar {
  background-color: $brandingColor;
}
However, this code actually means nothing to the browser. First, our preprocessor must compile this into CSS in order for the browser to be able to comprehend what these declarations mean:
.content {
  background-color: #F37621;
}
.sidebar {
  background-color: #F37621;
}
So, the problem is that our variable only existed within the CSS preprocessor language. Once this code is compiled into CSS by the preprocessor, we no longer have access to $brandingColor. The resulting CSS is completely static. We cannot dynamically update the preprocessor variable’s value. These preprocessor variables also do not abide by some key characteristics of CSS. Since they don’t actually exist in the compiled CSS, these variables do not cascade nor do they inherit.
The CSS community recognized the limitations of these preprocessor variables and invented CSS Custom Properties. The cool thing about CSS variables is that they are able to exist at runtime. This gives us control over these variables, allowing us to update their values and see those changes reflected immediately in the browser without re-compiling.
There are a lot of use cases for the dynamic nature of CSS variables, but I’m most excited about its implications for a more straightforward approach to app theming. Before we get into how to implement theming with CSS variables, let’s do a quick refresher on how to actually use CSS variables. If you are already pretty comfortable with the basics, feel free to skip on past to the theming section.
Using CSS variables
We’ll start with this simple example:
:root {
  —branding-color: #F37621;
}

.button {
  background-color: var(—branding-color);
}
Setting a CSS Variable
First, we’re utilizing the custom property notation that begins with two dashes to set our CSS Variable: —branding-color . When we define our CSS Variable by assigning it to a selector, we’re also defining its scope. Scope is unique to CSS variables since they, unlike their preprocessor counterparts, are subject to the cascade and can inherit their value from their parent. A CSS Variable’s scope consists of all the DOM nodes to which that particular variable will be available to. Any element within this scope will be able to inherit this variable’s value or update it.
In our case, our scope is being set as :root. The :root selector selects the root element on the page which is usually going to be the html element. But since it is a pseudo-class, :root will have higher specificity than html. In any case, because our variable’s scope is set to :root, our CSS variable will be available to all elements.
Applying a CSS Variable
Now that we have set our CSS Variable, —branding-color, we want to apply it to our .button. In order to do that, we must reference our CSS variable with the var() function. That tells the browser its about to use the value of the CSS Variable.
So this:
:root {
  —branding-color: #F37621;
}

.button {
  background-color: var(—branding-color);
}
produces the same results as this:
.button {
  background-color:  #F37621;
}
While the above example is just passing in the CSS variable to the var() function, that function can actually take two arguments. The first one is the CSS variable, and the second is a fallback value if the variable is not declared on any of its ancestors or if its value is invalid:
.button {
  background-color: var(—branding-color, orange);
}
Using CSS variables With JavaScript
So, like I mentioned earlier, one of the key features that make CSS variables so awesome is our ability to update its value. Specifically, we can now update those values dynamically with JavaScript. That means reducing the need to use JavaScript to apply inline styles or add/remove class names!
Now we can get the value and update CSS variables with two key methods you may already be familiar with for setting and getting typical CSS properties: .getPropertyValue() and .setProperty().
So if you want to get the value of --branding-color, the CSS Variable we used in our previous examples, you would use the .getPropertyValue() method like so:
  var styles = window.getComputedStyle(document.body);
  var bgValue = String(styles.getPropertyValue('--branding-color')).trim();
If you want to set the value of a custom property, you will have to use the setProperty() method:
document.documentElement.style.setProperty('--branding-color', 'black');The above code has now set the --branding-color variable to be black.
This ability to set and get the values of CSS variables is exactly what will come in so handy for app theming. So, without further ado…
The Fun Part: Theming
The Old Way
If you have ever tried to implement theming within an app, you know it’s a daunting and painful task. One of the main headaches that come with theming is increased complexity in your stylesheets.
Usually, in apps where the user chooses between preset themes, each particular theme style must be imported in the app’s main stylesheet or included as a separate stylesheets. Either way, this approach results in plenty of redundancy, bloat from unused styles, and overriding of default styles. Often times, theme styles are also nested under a main global theme class which results in increased specificity, a major no-no for scalable CSS.
If you want to get even fancier in your app and allow the user to set custom colors for the app theme, things can get even crazier and uglier with inline styles. One way to achieve this is to directly apply inline styles with the new user specified color to certain elements or plop them all in a style block in the view.
Twitter actually applies an ingenious version of this for their implementation of user customized theming. If you look at the source code for a Twitter profile, you’ll find something like this:
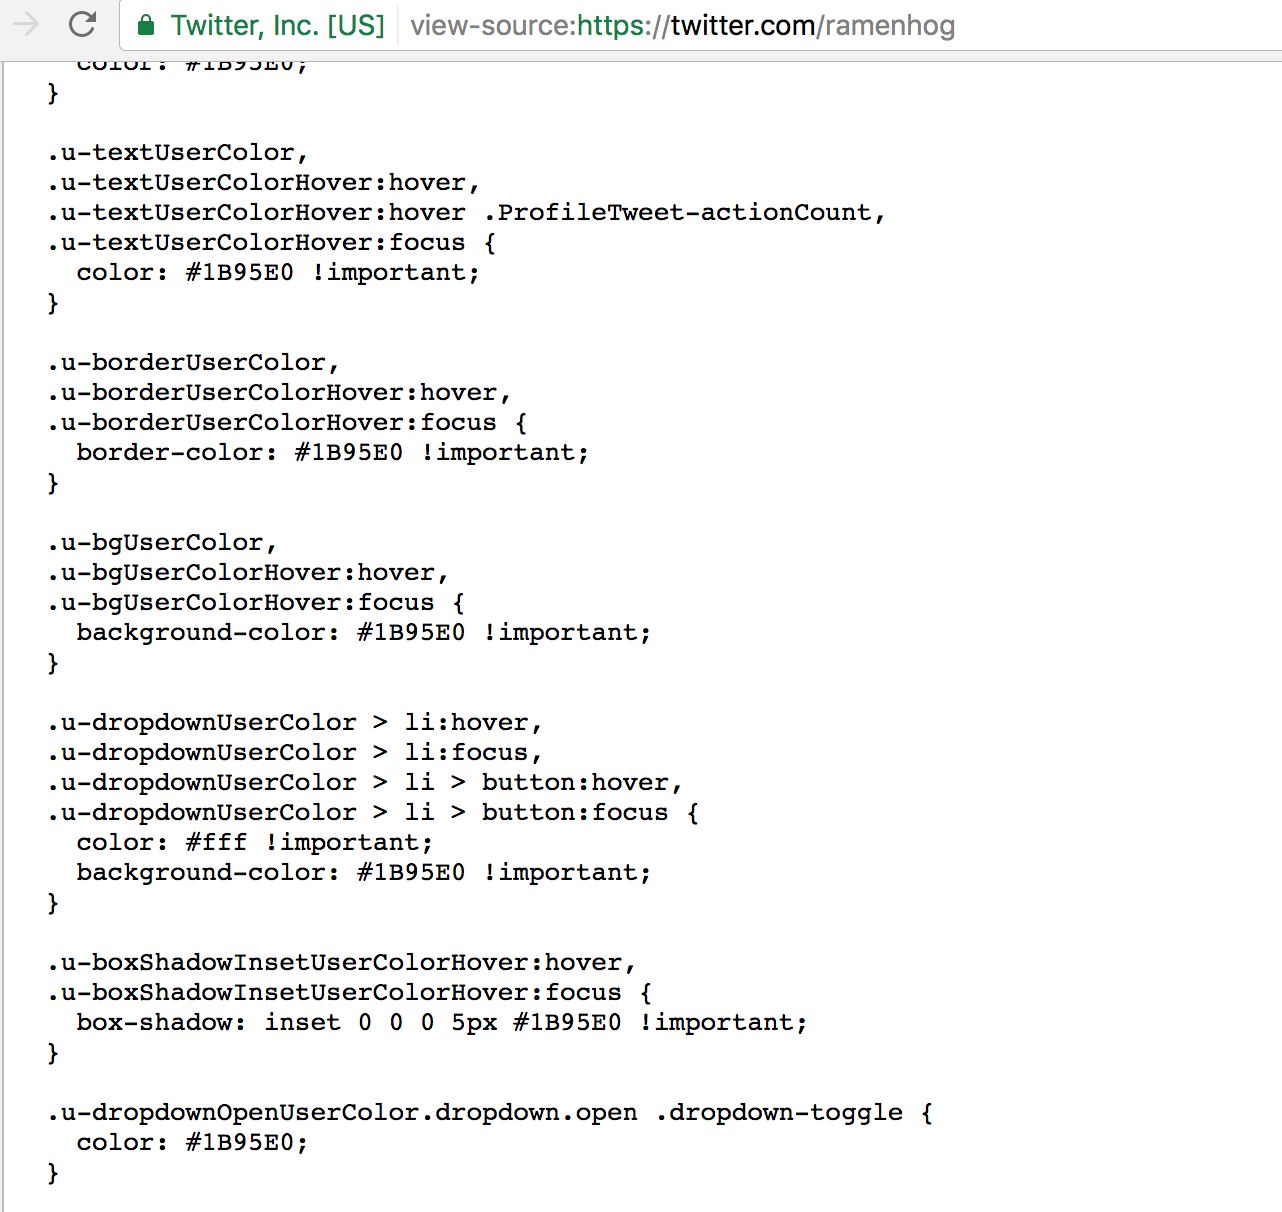
Their technique involves taking the user specified color values, which are stored in a database, and sticking them in the html by binding those values to utility classes. These utility classes are also placed onto elements that can be styled by the user. This method of binding allows the user to be able to apply a custom theme to the app with no additional developer input. But is there also a bunch of style redundancy and wasted CSS? You bet.
Theming in a World with CSS variables
The dynamic nature of CSS variables allows us a lot of flexibility when it comes to all forms of theming, both preset and user customization. Since we are able to update the value of CSS variables at runtime, we can reduce the amount of property overriding redundancy and wasted CSS that exists in apps due to theming.
The general idea is to define all the theme CSS variables globally at the :root and then apply them to themed elements by referencing those variables. Then, when those global theme variables get updated with JavaScript, no additional CSS needs to be written to update the app theme, eliminating so much of the overhead bloat that usually comes with app theming.
A CSS Variable Theming Case Study: Slack
So, to illustrate how powerful CSS variables can be for app themes, I set out to replicate the native Slack theming capabilities. I specifically chose the Slack theming interaction because it demonstrates both types of theming: preset theming and user customized theming. And both of these can be achieved with CSS variables:
See the Pen Slack Theming with CSS Custom Properties by Stephanie (@ramenhog) on CodePen.
To begin the theming process, I first declared all my global theme variables on :root:
:root {
  --column-bg: #ae0001;
  --menu-bg-hover: #680001;
  --active-item: #D3A625;
  --active-item-text: #680001;
  --hover-item: #BE0002;
  --text-color: #FFFFFF;
  --active-presence: #00FFBA;
  --mention-badge: #DE4C0D;
}
And then I applied those CSS variables with fallback values to the all appropriate elements I wanted to theme. For example, I applied --column-bg to the .sidebar element:
.sidebar {
  background: var(--column-bg, #ae0001);
}
All my themed elements are now initialized with their default theme color values. Even at this stage, if you play around and manually update any one of those variables in Inspector, you will see those color changes immediately reflected on the appropriate elements in the browser. No additional CSS needed.
 instamagic
That’s awesome! But of course, we don’t want our users have to update their themes via Inspector. Let’s take a general look at the two ways we give users control over theming within this demo Slack app.
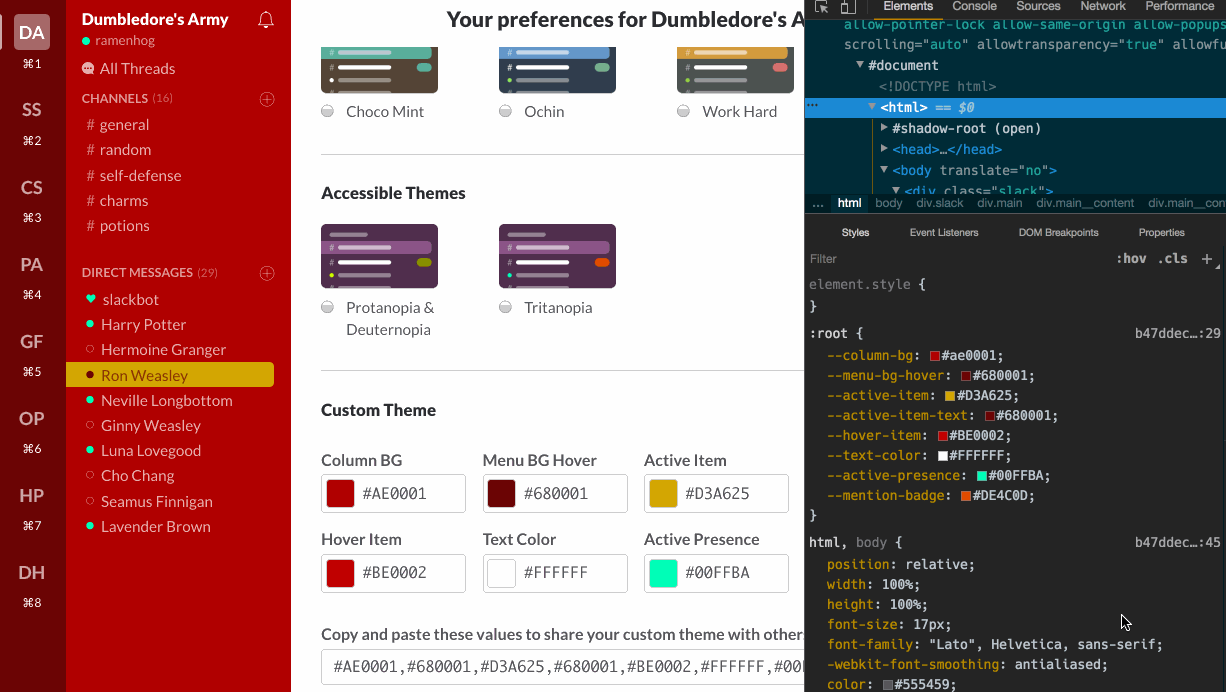
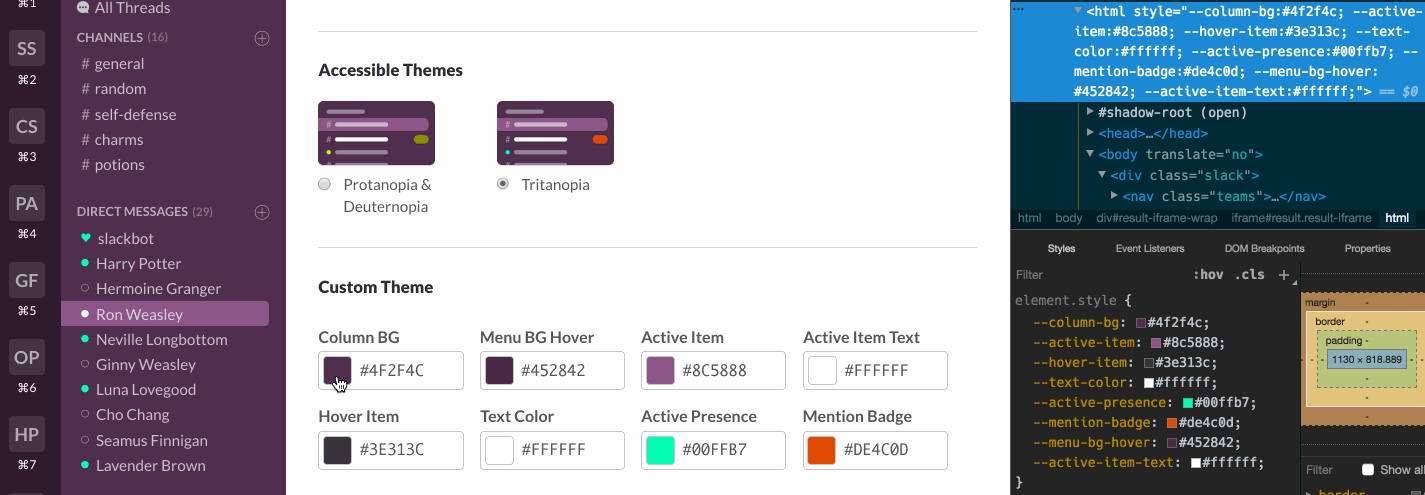
User Input Customization
If you’ve ever messed around with customizing your theme preferences in Slack, you know Slack offers the user complete customization by allowing the user to choose theme colors from a colorpicker. To make this work, we want to create some link between those color pickers and our theme CSS variables. Let’s check out the code.
In our markup, each color picker input has a class of .main__colorpicker and an id that corresponds to the CSS Variable it is supposed to update:
<input id="column-bg" type="color" class="main__colorpicker"/>Now, all we have to do in our JavaScript is loop over all the color picker inputs and attach an “change” event handler to each input.
const colorPickers = document.querySelectorAll('.main__colorpicker');

function handleColorPickerUpdate() {
  document.documentElement.style.setProperty(`--${this.id}`, this.value);
}

colorPickers.forEach(input => {
  input.addEventListener('change', handleColorPickerUpdate);
});
So, when any individual colorpicker’s value is now changed by the user, it will use the id of the colorpicker input to set the corresponding CSS Variable to its newly updated value. Now the user has complete control over all the CSS variables, and therefore the theme colors, through these inputs.
 Theming via user inputs
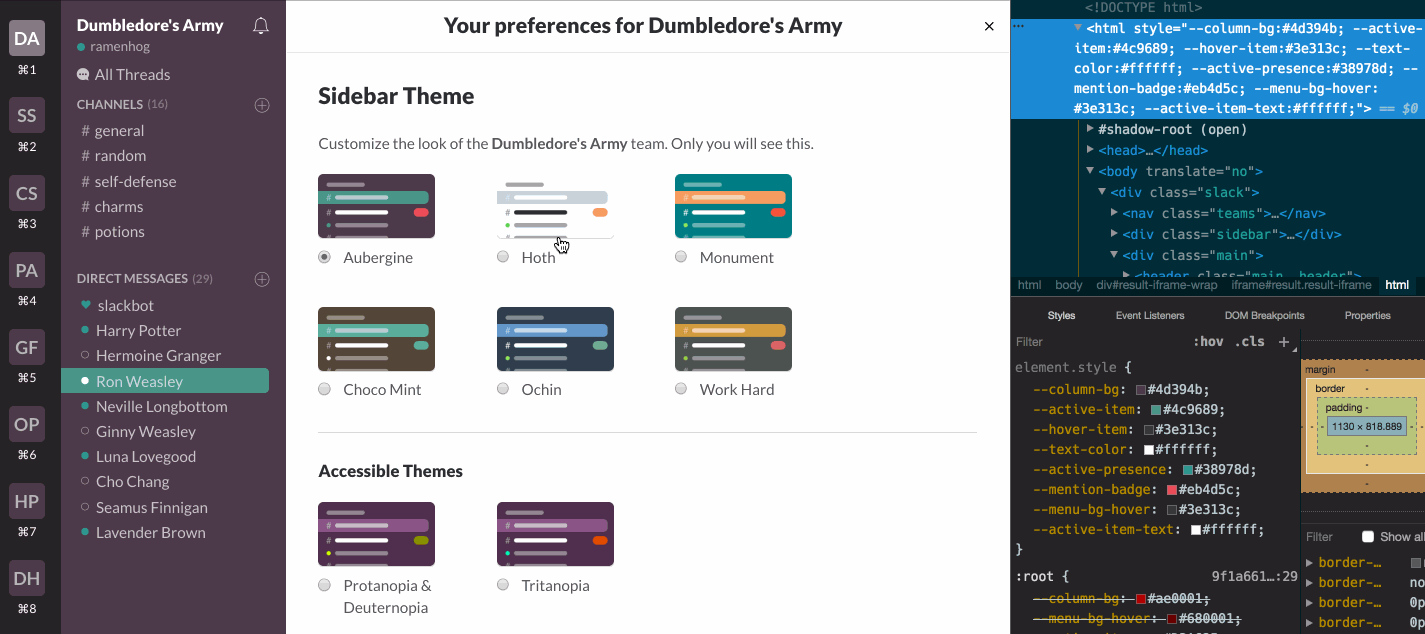
Preset Themes
In addition to user input theme customization, Slack also offers users a bunch of preset themes to choose from.
To replicate this feature, we’ll first have to create radio buttons in our markup:
<label for="aubergine" class="radio">
  <input id="aubergine" type="radio" name="theme" class="radio__input"/>
  aubergine
</label>
And then, we can bind an event handler to fire whenever a radio button is clicked:
const radioInputs = document.querySelectorAll('.radio__input');

radioInputs.forEach(radio => {
  radio.addEventListener('click', updateTheme);
});
Since each radio button input has an id corresponding to their theme id, in the event handler, we’ll just include switch statement to determine which theme was selected based on its theme id:
function updateTheme() {
  let hexString;

  switch (this.id) {
    case 'aubergine':
      hexString = '#4D394B,#3E313C,#4C9689,#FFFFFF,#3E313C,#FFFFFF,#38978D,#EB4D5C';
      break;
    case 'hoth':
      hexString = '#F8F8FA,#F8F8FA,#CAD1D9,#FFFFFF,#FFFFFF,#383F45,#60D156,#FF8669';
      break;
    case 'monument':
      hexString = '#0D7E83,#076570,#F79F66,#FFFFFF,#D37C71,#FFFFFF,#F79F66,#F15340';
      break;
    case 'chocolate':
      hexString = '#544538,#42362B,#5DB09D,#FFFFFF,#4A3C30,#FFFFFF,#FFFFFF,#5DB09D';
      break;
    case 'ochin':
      hexString = '#303E4D,#2C3849,#6698C8,#FFFFFF,#4A5664,#FFFFFF,#94E864,#78AF8F';
      break;
    case 'workhard':
      hexString = '#4D5250,#444A47,#D39B46,#FFFFFF,#434745,#FFFFFF,#99D04A,#DB6668';
      break;
    case 'solanum':
      hexString = '#4F2F4C,#452842,#8C5888,#FFFFFF,#3E313C,#FFFFFF,#D0FF00,#889100';
      break;
    case 'brinjal':
      hexString = '#4F2F4C,#452842,#8C5888,#FFFFFF,#3E313C,#FFFFFF,#00FFB7,#DE4C0D';
      break;
  }

  /* update color pickers */
}
As you’ll notice in the code snippet above, when the switch statement finds the matching theme id, it sets a hexString variable to the theme’s specific string of hexcodes. This list of hexcodes is ordered in the same way the color pickers are ordered. Therefore, the first hexcode corresponds with column-bg, the second with menu-bg-hover, and so forth. So after we determine the appropriate theme and its string of theme hexcodes, we can split the string into an array, find the corresponding colorpicker by index, and update that specific colorpicker’s value.
function handleShareUpdate(hexString) {
  const newShareArr = hexString.split(',');

  newShareArr.forEach((hexcode, i) => {
    const colorPicker = colorPickers[i];
    colorPicker.value = hexcode.trim();
    const evt = new CustomEvent('change');
    colorPicker.dispatchEvent(evt);
  });
}
Lucky for us, we already conveniently attached an event handler listening for changes on the colorpicker inputs. So when we just changed the colorpicker value and dispatched a “change” event for that input, our event handler fired and proceeded to set the appropriate CSS variables to their new values, updating the theme.
 Slack’s build-in preset themes
Storing Theme Data in LocalStorage
Now that we have the functionality for theming in place, we should also find a way to store the user’s selected theme. To accomplish this, we’ll take advantage of LocalStorage.
Whenever the theme gets updated, we’ll store the new theme string in LocalStorage with a specific keyname slack-demo-theme:
localStorage.setItem('slack-demo-theme', hexStr);And then whenever the app loads, we get that theme from LocalStorage with the .getItem() method. We can then pass that stored theme string into our handleShareUpdate function from before to update the colorpickers, which would then, in turn, update our CSS variables.
handleShareUpdate(localStorage.getItem('slack-demo-theme'));Now, whenever the user refreshes the page, if the user has selected a certain theme, the app will apply it consistently.
Conclusion
Whew, that was a lot! Thanks for sticking it through to the end. I hope by now you’ve been thoroughly convinced of the power that is CSS variables and understand more of its use cases, particularly in theming.
Please feel free to play around with the Slack demo codepen and explore the code. I touched upon the key concepts of how I used CSS variables for my Slack demo, but there are chunks of JavaScript in there I didn’t go into for this article. So if you have any questions or comments, please reach out. I’d love to hear from you.
Also, there are so many quality pieces of information regarding CSS variables and their use cases floating around on the interwebs. So if you’d like to learn more about them, definitely check out the links below.
Happy coding!